Table of Contents
|
How to extract an archive or disk imageTo extract an entire archive content using TC4Shell, right-click the archive, choose Extract to and then select one of the provided options for a destination folder. Usually, these options include Current folder (i.e. the folder where this archive is stored now), a folder with the archive’s name (if this folder does not exist, then it will be created during extraction) and the folders that you've opened in Windows Explorer. 
You can also specify a target directory for extraction by choosing Select folder. When extracting multiple archives at once, you can specify whether they will be extracted to the same folder or each in a separate folder with the corresponding name (the Use separate folders option in the shortcut menu). 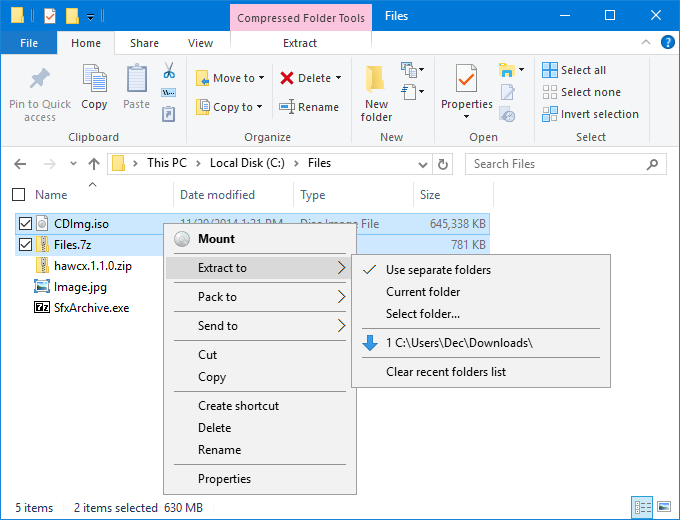
If you want to extract only certain files rather than the entire archive, open the archive in Windows Explorer, select files and folders to be extracted, choose Extract selected to and then select a destination folder for the extracted files. You can also unpack only the current folder in the archive: simply open the folder you want in the archive, choose Extract all to and then select the destination folder. 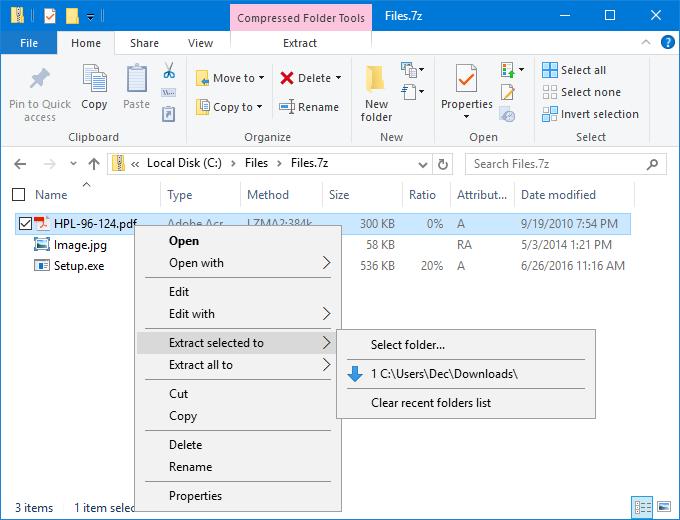
If the Ctrl key is pressed and held during the selection of the destination option, extraction will not start immediately – instead, you will see a folder selection window where the physical folder corresponding to your choice from the previous step will be pre-selected. This may come in handy if you need to extract files to a nearby folder, since you won’t need to waste time and clicks drilling down to the necessary location through multiple levels of folders and subfolders. Data extraction will start after clicking the OK button. TC4Shell keeps a record of folders previously selected for file extraction and adds them to Extract to, Extract selected to and Extract all to menu options. You can delete all these records by choosing Clear recent folders list. If the destination folder already contains files with the same names as in your archive, you will see the corresponding dialog (the dialog may vary depending on the Windows version and archive type). 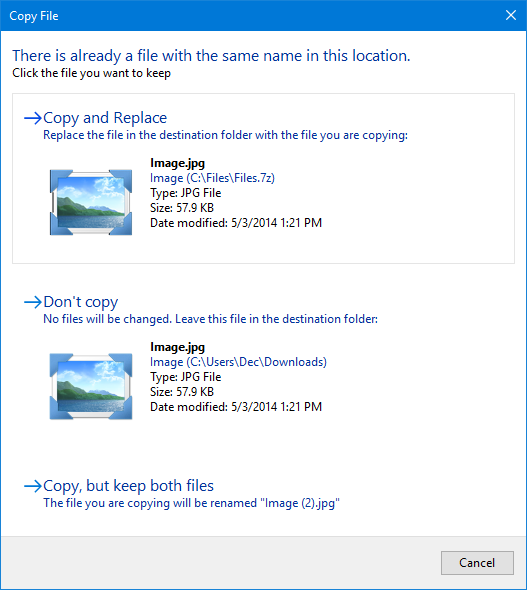
Important! You can also extract files from an archive using the drag&drop functionality, but it is not recommended, since extraction can be extremely slow in certain cases. Important! Yet another alternative is to use the copy&paste functionality for extraction. However, it is recommended that you use the Paste from archive command instead of Paste in order to speed up the extraction process. 
Note that if the archive is password-protected, you will have to obtain the password from the sender. Otherwise you won't be able to unpack the archive or extract any files from it. |
engrus